RS02 - Web Service REST Jobs
ℹ️ This Automic Tutorial is part of PEM Automic and was published on January 15th 2025.
📋 Content: 1 Video
🕒 Duration: 10 Minutes
In this course, I will show you step by step how to create and use REST clients in Automic to send requests to REST APIs.
Prerequisites
Before we can get started, there are two important prerequisites we need to have ready for our use:
-
An active REST agent: make sure that an active RA Web Service REST agent is available in your agent overview.
-
Object templates: Make sure the object templates are available by creating a new object and searching for “REST”.
Let's look at the steps for the Connection object (CONN):
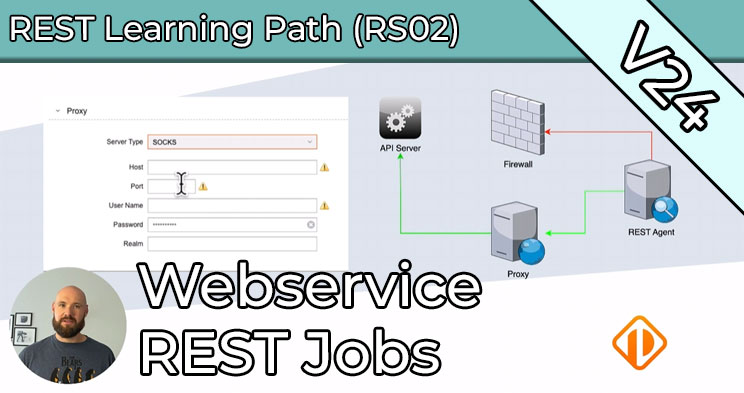
General information: Define the URL of your REST API. This is the only mandatory field in this object. Authentication: Define the type of authentication your REST API expects. Automic supports the most common methods, and the credentials are stored securely in the Automic database. Resources: Define the resources offered by the REST API. This will help us later when formulating the queries within the job. Headers and query parameters: Here we can define additional headers and query parameters to refine the queries. Proxy settings: A proxy for the connection to the REST API can be set up on the “Proxy” tab if required.
Creating a REST job
As with every job type, we must first define the agent on which the job is going to be run. Since the login data is stored in the CONN object, there is no need to provide any further information.
In the “Web Service” tab, select the previously created CONN object. Here you can also overwrite the automatically generated URI and add headers as well as request parameters in case special settings are required for certain request types.
You can now send your request and check the result.
Extracting information from the reports
You may want to extract information from the Automic reports. REST jobs also allow you to do this.
You can analyze the responses on the “Response” tab. Here you specify which header entries and data should be extracted from the body of the response. You can select various parsing methods and specify what should be done with the extracted data.
Conclusion
To summarize, Web Service REST jobs require a Web Service REST agent and a CONN object. The response to the request and the HTTP return code are always available in the report and can be analyzed in the “Response” tab so that the information can be extracted for later use.
Learn Automic with PEM!
Would you like to learn more about Automic without having to travel across the country for workshops? At PEM, you decide when and how you want to continue your education! In interactive courses, tutorials and videos, you will learn everything you need to know about Automic – and more! And we are always there for you via comment function or email.
Does that sound interesting? Then get started today with PEM, Automic Training 2.0 and year-round Automic support!
FAQ about Automic Training on PEM
PEM is the most innovative and fastest growing Automic learning platform. It offers PEM members a comprehensive range of online training courses that can be accessed 24/7 and from anywhere. The platform includes dozens of videos and interactive courses and is aimed at beginners and professionals alike.
To meet different needs, PEM offers different types of content: courses, tutorials, learning paths, labs and tools.
- In the courses and tutorials you will learn everything about Automic in entertaining and interactive videos.
- The learning paths offer comprehensive training on a specific Automic topic. For example, the 11-part operator learning path is suitable for beginners. Are you already an Automic expert? Then you will definitely learn something with the database SQL learning path.
- Labs are automated environments that are available at the touch of a button and where what has been learned can be put into practice.
- Tools with appropriate instructions are regularly provided on PEM . This allows Automic processes to be automated and simplified even further.
In our library, you’ll find all content items currently available on PEM. And every week, we add more items to learn Automic.
PEM Labs are comprehensive, pre-configured Automic environments designed to provide users with a hands-on and immersive experience. These labs offer instant access to multiple Automic versions, allowing users to experiment with functionality and explore new features effortlessly. Available on demand and at no additional cost for members, PEM Labs eliminate the need for complex setups or extra expenses. Whether you’re a beginner or an experienced professional, they serve as realistic sandbox environments ideal for learning and experimenting with Automic.
Labs are provisioned on demand with a single click and are automatically deleted after 24 hours.
There are two different deployment-variants for the Labs:
- Labs for Operator and Designer
These provide access to a dedicated Automic Client via the Automic Web Interface (AWI). - Labs for Admins
These labs include OS-level access through a browser, enabling members to perform all administrative tasks, including those at the operating system level.
PEM Labs are available in three formats:
- Test Labs
These labs are empty Automic clients or systems that members can use for their experiments. - Course Labs
These labs include one or more scenarios where users are tasked with solving practical exercises, similar to classroom training sessions. - Story Labs
Story Labs are like Course Labs but incorporate a storyline to make the experience more engaging and entertaining. Think of them as small adventure games where you solve puzzles using Automic.
The Operator, Designer, and Admin roles in PEM align closely with the roles available within Automic itself. Each role is tailored to specific responsibilities, ensuring users focus on the skills and knowledge most relevant to their work:
- Operator:
Operators are responsible for monitoring, executing, and managing workflows in Automic. In PEM, the Operator role covers topics like workflow execution, troubleshooting, and day-to-day operations to ensure smooth automation processes. - Designer:
Designers are the architects of workflows and automation solutions in Automic. The Designer role in PEM includes content on creating, optimizing, and maintaining workflows and objects, with a focus on best practices for efficiency and scalability. - Admin:
Admins handle system-level configurations, user management, security settings, and advanced maintenance tasks in Automic. PEM’s Admin role offers in-depth training on system setup, troubleshooting, and managing complex environments, including OS-level access through PEM Labs.
By mirroring Automic’s role structure, PEM ensures that members can seamlessly apply what they learn to their actual responsibilities within the software, making the training practical and highly relevant.
We host live sessions called Solution Corners 12 times a year, offering direct interaction with our experts. These sessions are open for questions on any Automic topic, and members can submit questions in advance for a more in-depth discussion.
Additionally, we provide online consulting—exclusive video conference sessions with our Automic specialists. Members with a consulting quota can book appointments directly via the experts’ calendars, ensuring flexible and personalized support.
In normal Automic training courses, the trainer is available to you for a few days. If you’re lucky, you might be able to provide input before the training, and if you’re particularly lucky, you might be able to ask 1-2 questions in the weeks following the training.
Our members can send us an email at any time. We answer questions immediately by email. If our members have questions about specific topics, they can also use the comment function. We call this “year-round Automic support”.
You always sign up for a membership for one year. After that, it is usually renewed automatically.
You can cancel at any time up to one month before the end of the contract with a simple email. Of course, you can limit the membership to one year at the beginning of the contract.